Sunday, October 24, 2010

Brochure progress

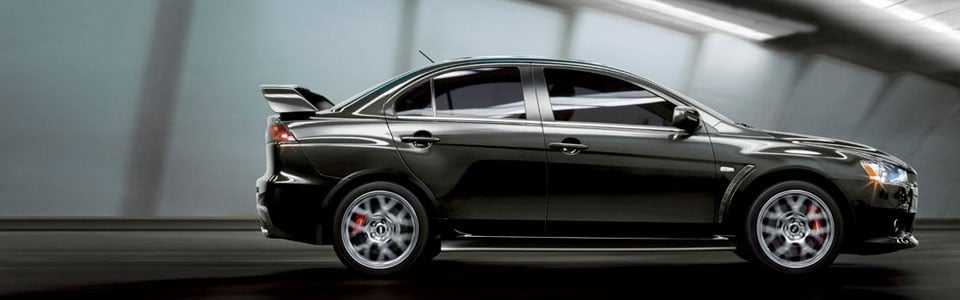
OK thought i chuck up my editing of my overall car exterior shot that is going to become my colour guide in my brochure

Same photo edited to achieve the real colours that Lancers are available in. This is not the layout that will be in the brochure, it is only meant to show the colour changes.

Wednesday, October 13, 2010

Front + Back cover of brochure

Ok here is what I think is probably my final layout for the front and back cover of my Lancer ACTiV brochure. Location shot taken near Lake George.

Friday, September 10, 2010

Second car shoot - exterior

Second time in the studio, this time with the exterior being the focus
Here is the (edited) result

Wednesday, September 8, 2010

First car studio shoot

Ok so I spent the morning in the studio shooting the interior of the Lancer, here is the result of that shoot

I used 2 lights (a big main softbox on the right, and a smaller one on the left shining in through the passenger window. A reflector sat below the camera on the seats (which were folded down) to reflect some more light onto the lower parts of the dashboard.

I will be reshooting this to make sure i get more detail down in the foot wells and also to make sure the rear view mirror is actually attached to something rather than floating the middle. I will also turn the headlights on so the speedo and tacho are illuminated


Sunday, September 5, 2010

Some more folio research

I have been looking up photos of the model of car I plan on shooting (or at least very close, theres not too much cosmetic difference between an Activ and an Evolution :) )

I thought I'd post some of em up as they are some of the types of shots I'll be aiming for.


Saturday, September 4, 2010

Vehicle Workshop

Prep as always


*Post will be udpated with studio images when I pull them off the Mac in the studio

Friday, August 20, 2010

Furniture Workshop

Prep as usual


Today we were required to shoot at least 2 pieces of furniture, and obtain at least 3 shots from each shoot
1) A typical brightly lit commercial style photograph for use in a catalogue.
2) A detail shot
3) An experimental lighting/composition shot

First shoot involved photographing the fridge in the studio.

1) Here are 2 examples of a typical brightly lit commercial photo (these photos have been retouched)


2) A detail shot


3) An experimental lighting/composition shot


Item number 2 was a red fabric chair.

1) A typical brightly lit commercial style photograph for use in a catalogue.


2) A detail shot (for some reason this is coming out a much more saturated red online uggh)


3) An experimental lighting/composition shot

Saturday, August 14, 2010

Fashion Workshop - Studio

As always, the obligatory research first


Ok so the workshop today revolved around fashion photography in the studio. Kate Luke organised some models and makeup artists and then took us through a typical fashion shoot.

The group as a whole helped set up the lights and then took turns photographing the models.

Here are some of our results (these images are unretouched)


Monday, August 9, 2010

Studio Folio Research

Today I happened across an interesting site with some tutorials about photographing cars and post processing the images. Quite an interesting site

http://www.carphototutorials.com

Sunday, August 1, 2010

Food Workshop

tFirst up, the workshop preparation


Today our task was to photograph items of food in pairs. Stations were set up in the studio to replicate natural daylight (partially due to the horrible weather on the day) and several stations also made use of the limited daylight available.

Here are Rhys and my results. We used the same natural daylight station for the duration.

Shot 1 - Chocolate biscuits.


Shot 2 - Spaghetti


Shot 3 - Kiwi fruit

Sunday, July 25, 2010

Portrait Practice

Upon our return to CIT for the semester, we were set a group task to take 3 portraits based on various scenarios given to us by Geoff. My group consisted of Amy, Stephen, Ginette and myself. We only had access to the props etc available in the studio and we had to make do with what we could find to suit the scenario
We took it in turns to act as model, assistant and photographer. Here are our results.

Scenario 1 (wording isn't exact as I don't have the paper slip we were given)
You are taking the portrait of the newly appointed PM. The image needs to give the impression of strength and compassion, and the ability to move forward.


For this portrait, we wanted to have it be quite light, clean and corporate. We tried to ensure that the model sat upright with shoulders back and had a determined but friendly look on her face. We lit the portrait using 3 lights, one to fill the face, a hair light from behind, and one more for the background. A reflector was used to further fill the shadow side of her face. Overall we agreed we were happy with the outcome, with the only changes we would make concerned things that we had no control over such as clothing, hair styling etc.

Scenario 2
You are taking a portrait of a married couple for their wedding anniversary.


For this portrait, we intially tried to pose the couple laying down, but this presented problems with the male's head appearing too small, so we opted for an up close side by side shot. We lit the background using a blue gel over the light to give it a blue tint, and then lit the models with frontal light to illuminate the faces, and a hair light to the top right. During the discussions within the our group later on we decided we could of had the models looking at each other instead of the camera to give it a more intimate appeal, and perhaps the angle was a bit plain. Overall though we were reasonably happy and came away with a few good points for future reference.

Scenario 3
You are to take a low-key portrait using a single tungsten light with a contemplative mood.


For this portrait, we felt to capture a "contemplative mood" that we should have the portait feel a little mysterious. Having the models face not front on, the predominantly black background with an unknown streak of light in the background (this is the door to the studio) both allow for the low-key requirement, and to add the sense of mystery we were seeking. The original photograph had a slightly excessive amount of negative space to the left of the models head which was mentioned during the final discussions with the class so here it has been cropped in for a more pleasing composition.